Orders
Ornavi let’s users create, edit, generate and manage all your purchase orders. There are two types of Purchase Order that can be created in the system: Job Orders are tied to specific jobs and Stock Orders are for items not required for a specific job.
Create an Order
Purchase Orders can be created in two ways:
The process after this point is almost the same.
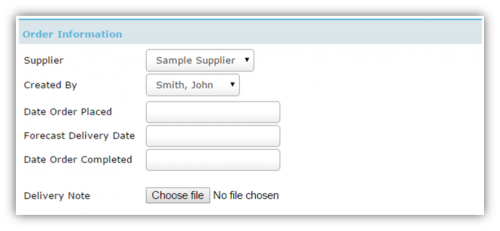 Select a Supplier from the drop down which is populated by the Suppliers created in the Supplier Manager.
Select who created the order – it will default to the logged in user.
The three date fields can be used to track the progress and status of an order in lists and reports.
There is an option to upload and store Delivery Notes against a Purchase Order. You can either scan the note into your PC and then upload it or alternatively a smart phone or tablet will allow you to take a picture and upload it.
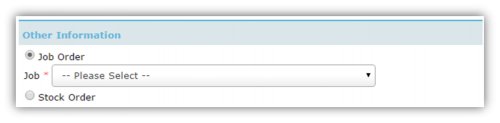
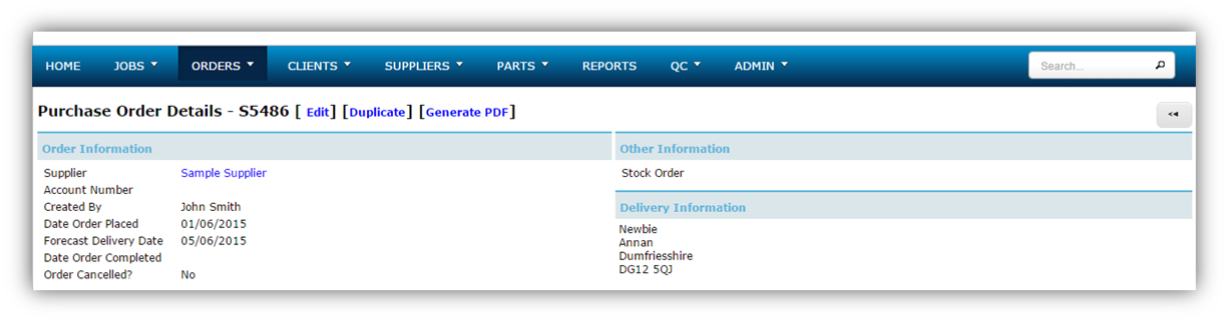
In the Other Information section (above) you are required to select the type of order you would like to create. A Job Order is an order that is to be tied to a specific job and you should select the correct job from the drop down list. If the job you require is not on the list, please check the job has an active status. A Stock Order is for ordering items that are not for a specific job.
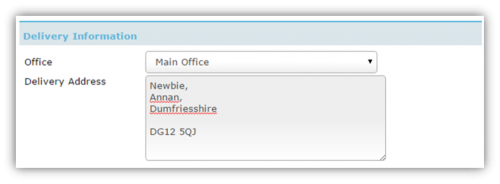 For Delivery Information you must state where the order items are to be delivered. Choose an Office from the drop down or alternatively you can manually add an address in the Delivery Address box.

Record any Notes to accompany the purchase order – these are for the Supplier’s attention and will appear on the final PDF document.
To add items to your order there are certain fields that are required: the Quantity, Unit type (for distinguishing if it is an individual item or an outer), Item name/description and an Item Price. The Total field will be calculated automatically using the Quantity and Item Price fields. The Code field is optional.
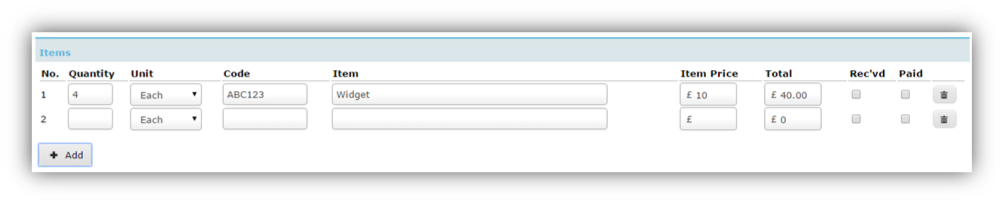
| Click this icon to remove any items from the invoice. | |
| Click this icon to add another item line to your invoice. |
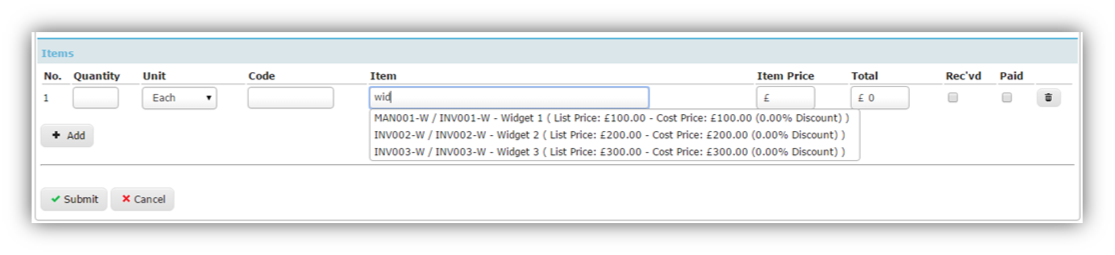
Alternatively you can add Inventory items to your order by typing three or more characters into either the Code or Item field. This will produce a drop down of parts matching your letters that you can then select to add to your order. If the inventory item has a price and/or a code, they will be added to the order automatically but can be edited if incorrect.
The Rec’d and Paid tick boxes are used after the order has been placed to keep track of which items have arrived and been paid for. Both must be filled out (along with Date Order Completed field) for an order to be deemed complete in the system.
Remember to click the Submit button to save your work and see a summary of your Order. This is also when the order number is generated. Every Purchase Order created in the system is given a unique number or ID. Furthermore, Stock Orders (orders not tied to any job) are prefixed with the letter S.
Find an Order
There are several ways to locate an order within Ornavi:
- Use the Purchase Order Search tool from the Orders drop down on the main menu. Use the filters to narrow down your search.
- Use the Gobal Search box on the right hand side of the menu bar. Simply type 3 characters or more and the system scan through all your records and return any matching results – a bit like Google!
- If your Order has not been marked as complete you can also locate it from Outstanding Orders which is located under the Quick Links on the homepage.
Edit an Order
Before you can edit an order, first locate it (see above).
Edit a Stock Order
Once you have located the order, open it by clicking on the Order ID. You will see the option to [Edit] at the top, alongside the title. If you click this it will allow you to make any changes to the order. Remember to Submit when you are done.
Edit a Job Order
Once you have located the order, you should be in the corresponding job folder. You can access the edit screen by either clicking the Edit button (pencil) or opening the order first and clicking the [Edit] link at the top alongside the title. You can then make any required changes. Remember to Submit when you are done.

Delete an Order
Deleting a Purchase Order is possible but you should be really sure you actually want to delete it because it is not possible to undo. You run the risk of losing valuable information and any traceability. Other options you might want to consider before deleting an order are:
- Mark the Order as Cancelled. You can do this by editing the order and ticking the Cancelled check box. This renders the order inactive, removing it from any financials but retaining the traceability.
- Edit the order to make it correct. You can add and delete individual items, and edit any other detail (apart from the ID).
If you are sure you would like to completely remove an order from your system then simply click the Delete button located on the right hand side of either the Purchase Order Search screen (Stock Orders), or the Orders tab of the Job Folder (Job Orders).

Generate an Order
Ornavi allows you to output your purchase orders using professional templates, that are ready to send on to the Supplier. A default template is already in your system, read below to find out the different ways you can use it.
Generate as PDF
To produce a finished order in a PDF format, first open the order and then click [Generate PDF] located in the header alongside the title.
This will prompt your final document to open in another page, which can then be saved or printed. Be sure to upload your logo to Ornavi so that it displays on the PDF.
Generate as Word Doc
To produce the order in an editable format (e.g. Word Doc), first open the order and then scroll down to the bottom where you will see a Generate From Template box.

The drop down will contain the default template, click the Generate button and the document will open in another page, and it can now be saved or printed. Be sure to edit the template first so that it includes your logo and any other required detail.
Generate using a Custom Template
You can completely customise the look and feel of you Purchase Order template and an in-depth guide of how to do this can be found in Settings help (scroll down to Document Templates). To upload a template, on the main menu bar click on Admin, the System Settings and Document Templates.
Once you have done this, you can generate your order using this new template by first finding the order and then scrolling down to the bottom of the page where you will see a Generate From Template box.

The drop down will contain the default template, so be sure to select the correct template. Click the Generate button and the document will open in another page, and it can now be saved or printed.
Duplicate an Order
Existing orders can be duplicated to save time. Open any order and you will find a [Duplicate] option at the top alongside the [Edit] and [Generate] options.
Once you click the Duplicate link you will be taken into the edit screen so you can make amendments.
In the Other Information section you can choose what type of order it will be i.e. a stock order or a job order. A duplicated stock order can be turned into a job order and vice versa. A duplicated job order can either be attached to the same job or a different one.
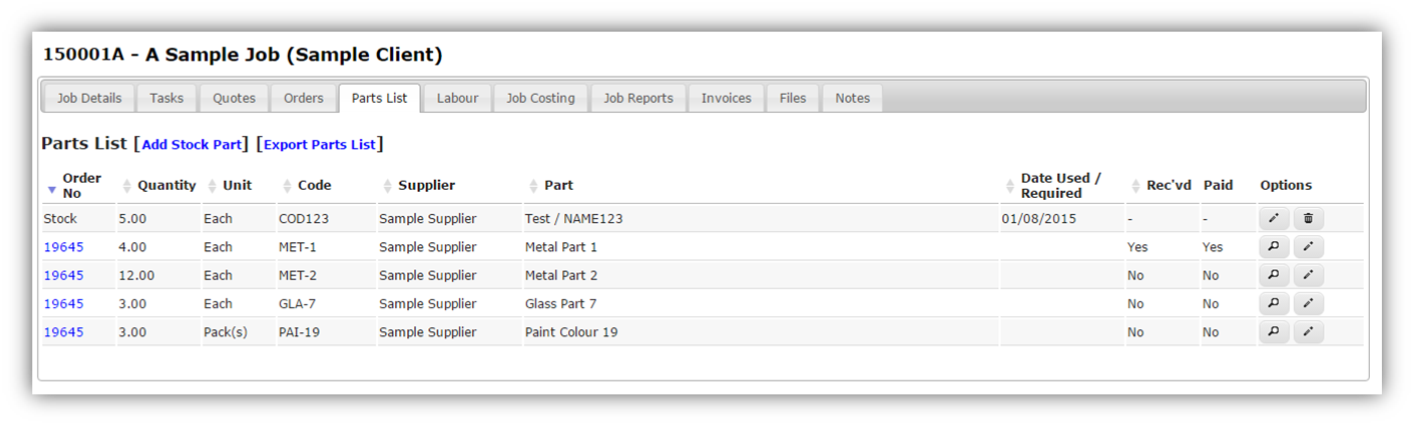
Parts List Report
Within any Job Folder, users can access a handy report of all parts used/required for that particular project. This automatically generated list is comprised of every part that has been order for the job via the Purchase Orders tab.